Quick Finder: Quickly find the needed documentation by simply clicking on the topics below.
InstallationMenuThumbnailsLogoAuthorSocialAdsSliderColorWidgetsAnalyticsPage TemplatesResponsive AdsenseFooterUpgradeFonts
Welcome to Iconic One Pro online documentation, it covers all the aspects and usage of Iconic One PRO WordPress Theme. It has been written in a very beginner friendly approach, even if you are new to WordPress you can get up and running a complete optimized blog in under 5 minutes with Iconic One Pro.
How to Install Iconic One Pro?
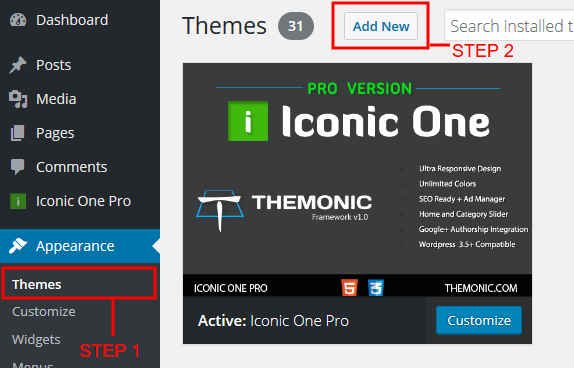
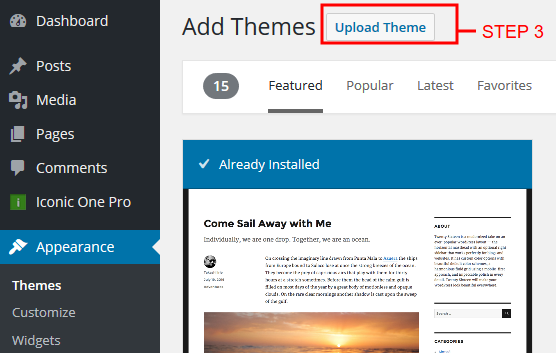
It is a very easy process, Simply go to Appearance -> Themes -> Install Themes and upload the zip package that you received after purchase. You can also directly go to
yourdomain.com/wp-admin/theme-install.php?upload
to upload the theme’s zip file.
Update: From WordPress 3.8 | Go to Appearance -> Themes -> Add New -> Upload
For Mac users: Safari auto unzips the downloaded zip file. To disable auto unzip by Safari browser refer:
- Open Safari -> Click Preferences -> Under the General tab, uncheck the option Open “safe” files after downloading
Or
- Simply use Chrome or Firefox browser to download the zip file as it is for upload.
How to setup the Responsive Menu?
If the Menu is not visible/disappearing in mobiles/iPad etc:
This means that you have not configured the WordPress menu system yet, to do this simply select your menu as “Primary Menu” by going to Appearance -> Menus, kindly refer to the following image and you will get it working in no time.

Iconic One Pro supports the native WordPress Menu system that allows you to create custom menu even with external links and custom page links in just a few seconds.
How to setup Thumbnails?
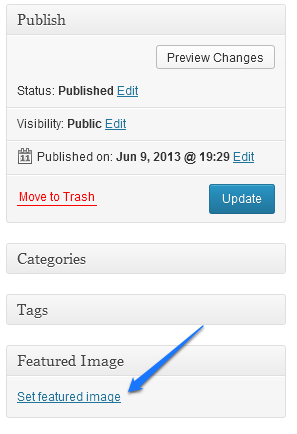
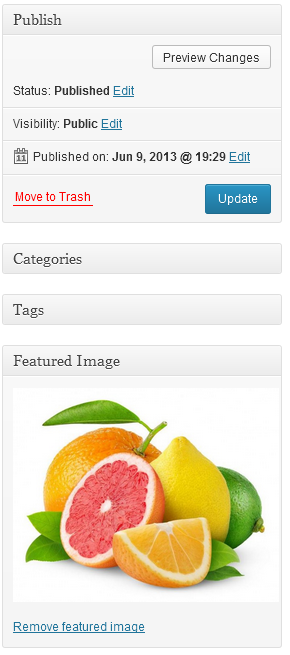
The Thumbnails feature of Iconic One Pro works out of the box for new installations, just make sure that you setup a Featured image for thumbnails to show. If you have an existing blog on which you are installing Iconic One Pro, all you have to do is install a free plugin name “Regenerate Thumbnails” and it will regenerate your previous thumbnails to Iconic One Pro compatible thumbnails. This will also fix the different size thumbnails issue in Related Posts.
To Regenerate thumbs: Go to Tools -> Regenerate Thumbnails
It’s a one time process which regenerates the older uploaded images, afterwards you can uninstall the plugin.
Show Featured Images Automatically below Post Title
If you want to show Featured image automatically below post title. Go to Theme Control Center -> Main Settings -> select the option with corresponding name and turn it ON.
Note: If you do not understand what Featured images are and how they work kindly leave this OFF. ( You can use OFF when you wish to manually place images, for eg. after first paragraph )
How to upload the Logo?
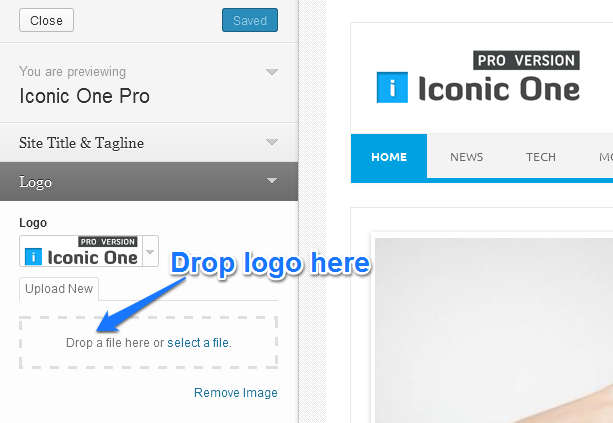
Easily upload the logo from the Live Customizer, it will replace the site name and description.
How to upload header image?
Starting version 1.4.9. Simply upload an image of size 1040px via logo uploader and check the tick box below it, screenshot below:
How to setup Google+ Authorship and Author’s Page in Iconic One Pro?
Go to Your Profile to enter your Google+ profile URL.
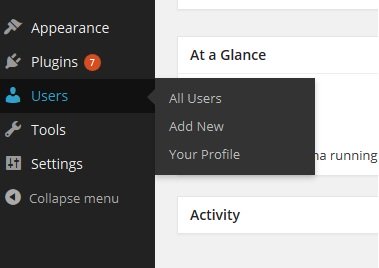
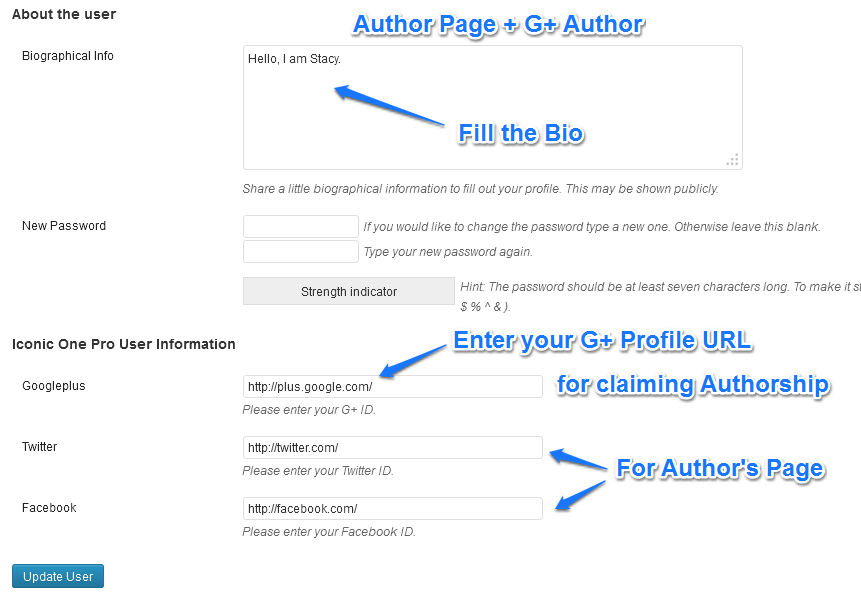
We have made it very easy to enable proper Google+ rel=”author” markup, simply fill out the profile field of Google+ in the User Profile fields added by the theme, these are available inside the Dashboard Menu -> “Users” or go directly to (yourdomain.com/wp-admin/profile.php) and link your Author page from your Google+ profile and your profile image will start appearing in Google+ search results in a few hours. Make sure the profile picture has a recognizable face otherwise Google’s automatic algorithms will reject it.
Author ID – ON/OFF Settings available in Control Center – > Main Settings
It is used to display author profile thumb on Home page : It uses Gravatar profile image associated with the respective Author email address in their Profile.
Author Image is not displaying?
Go to Gravatar.com and register a free account, after that you will be able to associate your profile picture with your email ID.
Author Bio Not Appearing below posts?
Requirements for Author display below posts are:
1 – Your blog must have more than one author.
2 – All authors must have filled in profile bio (WP Dashboard -> Users -> Your Profile)
3 – All authors must have at least ONE post assigned to them
Update(Jan 2020): In the latest versions, only point 2 is required for author display.
How to setup Top Social Media Links in Iconic One Pro?
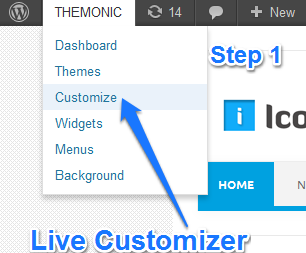
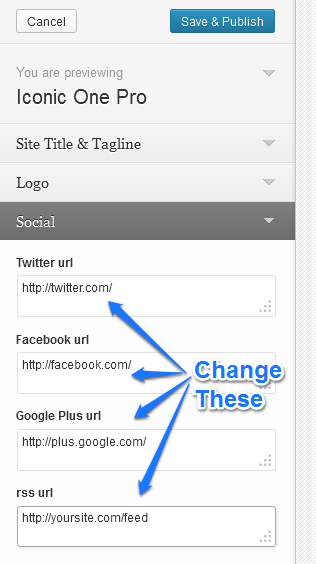
Leave the respective social URL field empty and then Save to hide, the changes will appear instantly in the live customizer.
How to setup Social Media sharing buttons in Iconic One Pro?
![]()
All Social Sharing settings are available in the “Social” tab inside the Theme’s Option’s Panel. Simply Enable Social Sharing and then select which sharing services you want to show at your blog.
How to Install Adsense advertisement?
![]()
Advertisement settings are available in the “Ad Management” tab inside the Theme’s Option’s Panel. For eg. if you want o show an Adsense unit below the Article Title simply enable the Below Title #AD1 area and paste your Adsense code in the HTML field section that says #AD1. Dont’ forget to save the settings.
How to use Responsive Mobile Ready Adsense Ads and AD Locations?
All Ad locations in Iconic One Pro support Responsive Adsense Ads, simply select the Responsive Ad unit in Adsense Ad panel while creating new Ad unit. Yellow areas in the below screenshot shows the Ad areas available in the theme which can be managed by going to Control Panel -> Ad Management. These Ad areas can also be used for custom banner advertisements: First Two Ads in the screenshot below can have 1040px max width, next two in-article Ads can have max width 655px. To add spacing below your Ads simply add <br> after your code.


How to Enable and Setup the Sliders?
![]()
Slider settings are available in the “Slider” tab inside the Theme’s Option’s Panel. There are two sliders: 1) Home Page 2) Category Page . Home Page slider has an extra option to select a category from which the posts will appear in the slider at the home page. Category Page slider will slide posts from its respective category. For eg. Food Category page slider will slide images from Food Category.
Slider setup: Slider slides the featured images from posts.
If your website is new: first create some posts with their featured images set -> assign those posts to some category -> select that category by going to slider settings in the control panel as shown above.
Using Slider on Static Home Page: Simply select the slider page template.
Slider Size Issue:
Run this plugin once https://wordpress.org/plugins/regenerate-thumbnails/
It will regenerate old images to theme required sizes.
White blank space in slider: Make sure that the featured images are above the minimum size of slider image (use minimum image size of 660 x 300 px ) otherwise blank space issue will occur.
How to Setup Google Analytics or Statcounter for tracking page views?
![]()
Tracking code installation settings are available in the Footer section in the options panel, activate the area and then paste your Google Analytics or any other service tracking code and hit save. Footer is the best area to install tracking code as it will load after your content for better visitor experience.
Footer credit link and footer widgets
How to remove the credit link?
Go to the Footer tab in the Options Panel and remove the tick from the Footer Credit link option, screenshot given above.
How to install Footer Widgets?
Go to Theme Options Panel -> Main Settings -> Activate Footer Widgets. Now to place widgets go to Appearance -> Widgets. Here you will now find three areas: Footer One, Footer Two and Footer Three.
How to setup Author’s Page?
To enable the Author’s page like in the demo, simply fill out the Author’s Bio and Google+, Facebook and Twitter fields added by the theme in user’s profile field. If your blog has multiple author, they will have to go to their profile page and fill our their details. See the Google+ Authorship Image for reference.
How to setup the Contact Page?
We recommend a free plugin “Contact Form 7”, create a new page and paste CF7 shortcode. It’s very easy to install and use.
How to upload Favicon and WP-login page logo?
For this Go to the Design settings tab in the Theme’s Option’s Panel.
Main Settings
![]()
How to change the Iconic One Pro theme color?
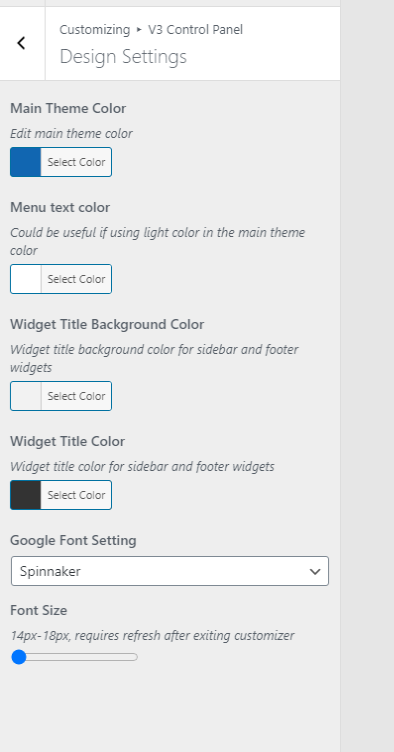
- For This Go to the Design Settings in the Live Customizer -> V3 control Panel.
- Note: Please make sure to set the Main Theme Color and Save on new installations, via Customizer -> Publish after changing color, if you do not do this then the sidebar/footer widget buttons will appear blank.
How to Show the Theme widgets (eg. Email Subscription) in the right sidebar?

Update: Please use this Classic Widgets plugin https://wordpress.org/plugins/classic-widgets/ if you are using the latest WordPress version to use theme provided widgets.
Update: Please ignore the Email Feedburner subscription widget, Google has stopped the Feedburner service, this widget will be removed in the next update.
You can use the Widget named “Email Newsletter” instead for email capture form, can be seen the demo https://demo.themonic.com/iconic-one-pro/
How to use the Inbuilt Page Templates while creating Pages?
Open Screen Options to toggle visibility of Page Templates section if it is not visible on your pages. After that select a page template from the drop down template list ( Full Width | No Title | Landing Page )
![]()
How to use Slider on Static Home Page?
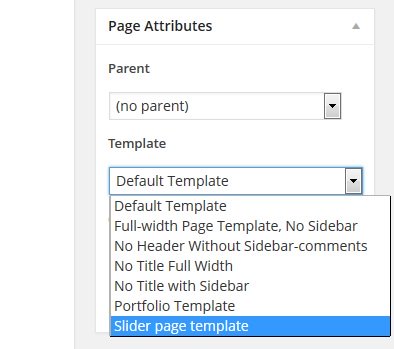
Simply select the Slider page template for the page you have set as static home page.
How to Show Related Posts with Thumbnails in the sidebar?
See the above image for reference, Drag and drop the Related Posts with Thumbs widget added by the theme to the sidebar.
How to show Popular Posts with Thumbnails in the sidebar?
See the above image for reference, Drag and drop the Popular Posts with Thumbs widget added by the theme to the sidebar.
How to Enable Breadcrumb and Pagination?
These settings are available in the Main Settings tab in the Theme’s Option’s Panel.
How to change the Background Color or Background Texture image?
Select the background color from the Live Customizer. You can also upload your Background texture image from the Live Customizer.
Why some Iconic One Pro Settings are in the Live Theme Customizer?
The following settings are available in the Live Customizer (/wp-admin/customize.php) of Iconic One Pro:
You can also access this by going to Appearance -> Basic Settings
– Logo upload
– Top Right social buttons links
– Background Color and Background Image
– Navigation Menu Selector
– Footer text section (Custom footer text left and Custom footer text right)
These are available separately because if you have to reset the framework options panel your website will still remain perfectly functional as all the settings that are present in the Live Customizer will be saved as they are independent of the options panel. These are the bare necessities that should not be affected should you choose to reset the framework options panel. Besides, this is a one time setup.
How to install the recommended plugins?
Go to Plugins- > Add New – > Search and install.
Recommended plugins: Contact Form 7 for creating an easy contact page and if you are installing on existing website then Regenerate Thumbnails. Similarly, you can install the other plugins too.
Upgrade from Older Versions:
- Delete the Iconic One Pro that is installed from the themes page. Appearance -> Themes -> Click on Theme -> Delete button will be visible bottom right if the theme is already deactivated.
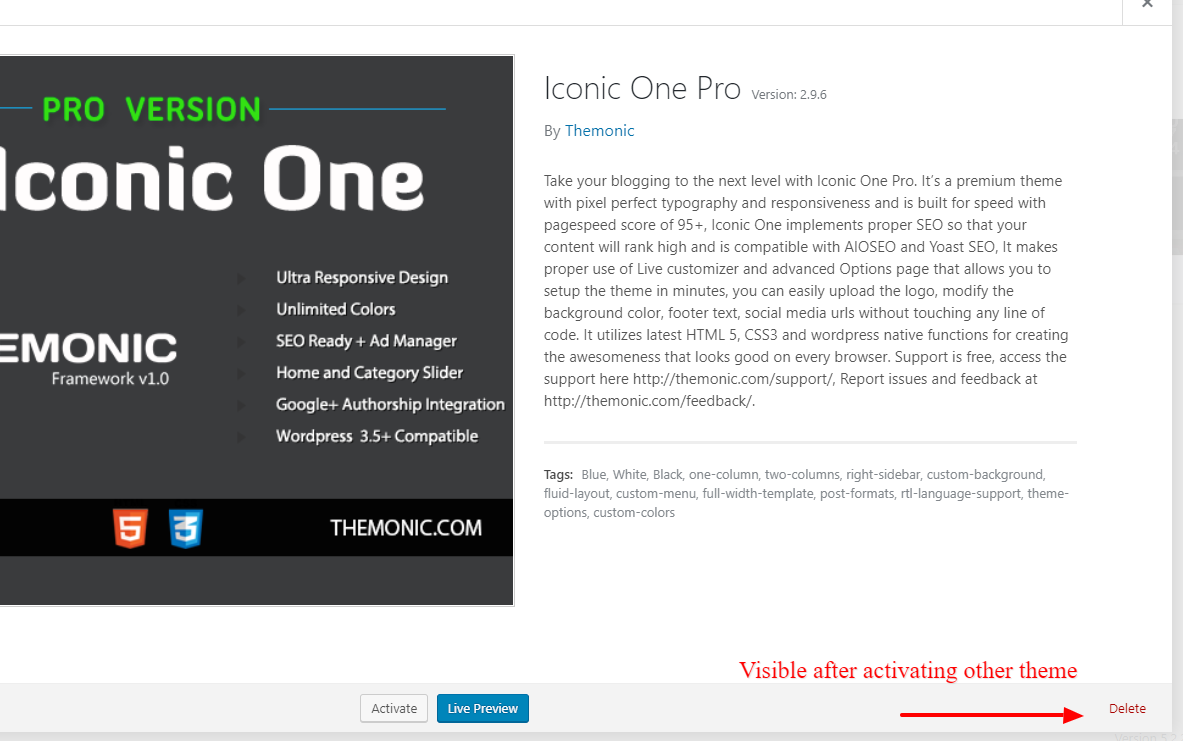
- Download the latest version of Iconic One Pro from the member’s area. Now upload this new version by going to Appearance -> Themes -> Add New -> Upload Theme
Note: If you haven’t updated in a while and with new major releases, widgets sometimes require to be re-adjusted. You can check the changelog.txt inside the theme folder to see if you really require the latest features/fixes before upgrading.
Font Family and Font size changer
- Starting version 3 you can now change font family and font size from Live Customizer -> v3 Control Panel -> Design Settings. With immediate result visibility you can chose a typeface and adjust font size on the fly.

This documentation will be updated regularly.
Latest Documentation Version is 3.2
– Last Updated on: Feb 28, 2025.
InstallationMenuThumbnailsLogoAuthorSocialAdsSliderColorWidgetsAnalyticsPage TemplatesResponsive Adsense

